***additional post here - some questions answered!
**** YOU'LL NEED THIS IMAGE ALSO IT IS NUMBER 15...IT IS MISSING FROM THE DOWNLOADED IMAGES http://thecre8tiveoutlet.blogspot.com/2011/02/15-this-missing-link.html
***UPDATED 60IN PROJECT (another post and template)
This Project only cost me $12.51, Another $8.54 If you add the cost of the 3m command picture hanging tabs. This only took about 3-4 hours (including dry time). Remember the goal is an aged weathered look so imperfections are welcomed!
This is my first tutorial so ... here it goes!
First I went to Lowe's and found pre-cut 24"x24" plywood pieces. The tag says "luaren-ply" they cost $2-$3 for each. I bought 4.
Then I painted each piece. First one coat of white, then one coat of antique white, and finally I wiped a watered down burnt sienna glaze. (I call this a "glaze" but it is nothing more than an old tube of burnt sienna paint squeezed into a cup and watered down). This gives the wood a solid but distressed/old look.
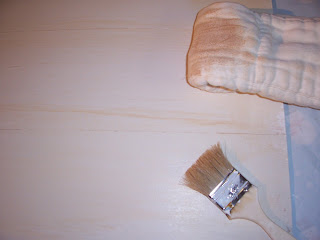
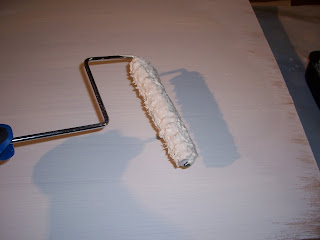
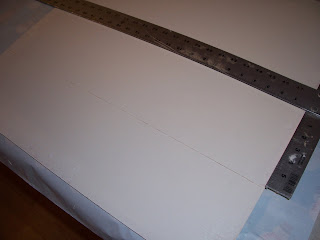
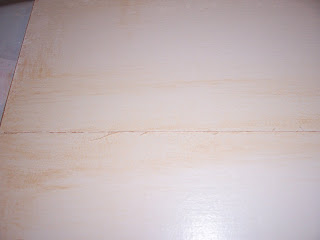
The PB version is wood planks, so after my paint was dry I used a utility knife and a metal t-square (you could just use a ruler) to make a horizontal "cut" every 6 inches. It really only scores the wood.
The I went back and "glazed" more burnt sienna over the groves - giving the look of planks.
The next step - transferring the image. You do not need to be an artist to do this.
I found my image from LIFE online and took it into photo shop. There I added a filter giving it a distorted look and sectioned into 8in grid squares. Lucky for you I did this for you this was the most tedious part.
Next I painted the area to transfer the image with Mod-Podge Matte then laid the image face down on top and pressed down. Leave it on for about 1-2 minutes. Sometimes the paper will stick but you can peel it off after it dries.
So you are transferring the image using Mod-Podge. I also found this similar tutorial
http://www.homemademamas.net/2010/03/gel-medium-transfers.html
Sometimes the transfer is not perfect and sometimes the paper will stick. I did not mind this being as the overall look of the piece is aged and distressed. If you want a clear perfect transfer use the link above.
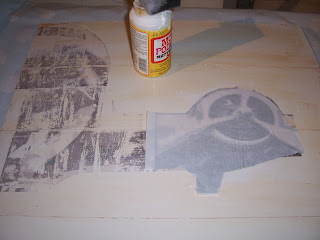
After the image was completely transferred and dry I used my "glaze" again and painted over the areas where the printer ink was black/purplish. I wanted a more sepia/brown coloring. I then gave each piece a random sanding in areas to create that weathered/aged look.
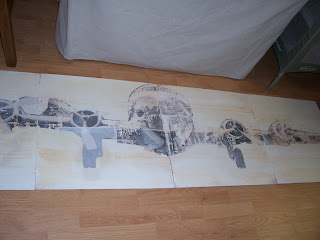
And this is what is turned out like! I couldn't be happier with the result.
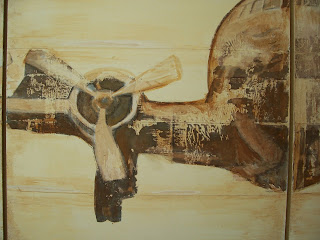
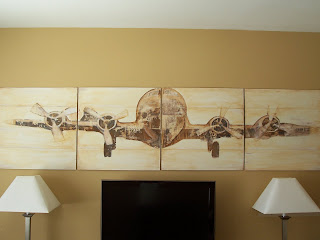
Now it's your turn! Here is the grid to print you own! (it is made to be printed on a home printer 8.5inx11in paper.
***UPDATED 60IN PROJECT (another post and template)
REMEMBER....YOU ARE TURNING THE PAPER OVER - FACEDOWN...SO THE PROJECT WILL START RIGHT TO LEFT...NOT LEFT TO RIGHT!!!!!
Other ideas......
Have the image printed to a vinyl and apply to wood
Use other images found online
Paint something original

Melissa! WHERE do you find the time to do this?! I think I may try this for our house. Our new house is lacking in decoration....so if you want any blogging projects you can help us out...heee hee. Hmmm, If I pay for your flight over to NZ will you decorate our house for us?
ReplyDeleteYay! I'm your first follower! This project is awesome...I love it! I don't know how you find the time with three kids. Amazing! =)
ReplyDeleteWOW That is a fabulous knock-off!
ReplyDeleteGreat job!
You def have a new follower in ME!
Holy cow! I fell in love with this when I saw it in the PB catalog and wondered how to recreate it. I had NO idea. You are a genius! I hope I can duplicate it HALF as well! Thank you!
ReplyDeleteWow this is AMAZING!!! Thank you SO much for sharing it and your free download :) LOVE LOVE LOVE!
ReplyDeleteI am impressed! Wow!
ReplyDeleteI just became a new follower. If this is what you've done on your second post I can't wait to see what else you will do. Thanks for sharing.
ReplyDeleteI have eyeballed this EXACT picture in PB magazine since it came out......I want it sooo bad but I refuse to pay that price...... I am going to surprise my husband and do this project...... YOU.ARE.AWESOME. !!!!
ReplyDeleteBTW- what type of paper did you use to print your images?
ReplyDeleteThis is great! I'm not sure the plane idea would work for me, but it's a great concept that could be used for anything. Great tute! Thanks for sharing ... I'll be linking. And please come join my link party anytime!
ReplyDeletehttp://childmade.com/index.php?name=Shared%20links
YOU. ARE. AWESOME!!! My husband saw this at PB and has wanted it but neither of us can see paying that much for it. I am going to follow your tutorial and give this to him as a surprise birthday present!!! I am so excited I found you (through DIY by Design blog)!!! I can't wait to get started!!! Thanks so much for sharing this. Chris
ReplyDeleteAmazing! I am beyond impressed! I am visiting from Judy's party and I'm now your newest follower! :-)
ReplyDeleteVanessa
That looks so good! Like show stopping good!
ReplyDeleteHi I am visiting from Under the Table and your project is really amazing. I will be your next follower!!
ReplyDeleteCount me in as a follower!!!!
ReplyDeleteI have admired this project in PB for quite awhile. I can't believe how you figured out such a great knockoff.
Can't wait to give it a try!
Thanks so much for such an excellent tutorial. Never would have believed it was your first!
Cori
I'm your newest follower! That is amazing!! I think I want to do this for my twin boys toddler room. Thanks for the inspiration and tutorial!
ReplyDeleteThis is so amazing! My husband and I have been looking for some large living room art. This kind of thing would be perfect for our place. Is that the Spruce Goose? I have seen it in person - HUGE!
ReplyDeleteYou are just FREAKIN' me out right now! I've wanted and wanted, did I mention WANTED??...to do this but I can't even draw a stick figure. Now you've gone and made the transfer for us? Oh, I do believe I'm gonna get all weepy for sure Ö Look out 3 day weekend, here I come wih Mod-Podge, paint...and mehbeh a small glass of wine. Ssshhhh, thank you soooo very much!
ReplyDeleteand of course, I'm following you *Ü*
ReplyDeletethis is really neat! I am wondering 2 things, will my home copier work and do you think that it will work in color copies? Thanks for sharing!!
ReplyDeleteThis turned out so great! It has inspired me to try some super sized art for my master bedroom!
ReplyDeleteI absolutely love the final outcome of this! Its gorgeous! I am going to try to make a mini one, and if it turns out do a few in different colors!
ReplyDeletePlease join me on my blog, and read my story.
This is such an awesome project and I am so impressed with how creative you were in figuring it all out! Love all of your other PB knock off ideas too.
ReplyDeleteI'm nearly speechless. You're amazing! I was looking through my PB catalogs the other day and was contemplating a way to duplicate that airplane art. I came up blank. Way to go!!! Robyn
ReplyDeleteHi Melissa, this is incredible! You're one smart little cookie. I'm glad I found you on FF. Now I can follow you and see all the smart tricks you come up with.
ReplyDeleteHugs...Tracy :)
P.S. Hope you'll stop by and visit sometime. I'm having a giveaway too.
Love it! Great job! We are a pilot family so I must do this somewhere in the house. Saving! Thanks!
ReplyDeleteWOW! I am in love with this! That looks amazing! I am your newest follower and I am so excited to see what else you come up with!!!
ReplyDeleteknuckle bump!! YA!
Have a great weekend!
Tasha
This is great and so cool of you to share how you created it...I have to try some hodge podge one day.
ReplyDeleteBlessings Kelsie
Hi, I'm visiting from Saavy Southern Style's WUW party. Must say for your first tutorial, you knocked it out of the park. I LOVED your final project. I think I might have to try my hand at it : )
ReplyDeletethis is beautiful! can't wait to do it for my son's airplane themed nursery!
ReplyDeleteI really really like this. I just don't know what I would do with it. Bookmark
ReplyDeleteYou are my HERO!!! I have saved this pottery barn image awhile ago and I've been planning on painting that on the wall....I transfer images with a projector and paint 'FREE' art all around my home...
ReplyDeleteI can't wait to do this! I would like to feature you on my blog...
girlinair.blogspot.com
Fantastic! Thank you for the tutorial!
ReplyDeleteThank you so much for this post! This will be the perfect gift for a friend of mine! He works for an airline and had giving us the best present ever and i had no idea how to pay him back in a million years! I´m going to follow your tutorial and try it out!
ReplyDeleteAnna (from Mexico)
i have this all printed out and piece #15 is missing.... can someone help... i really would like to get this project complete
ReplyDeletePrevios post....Let me look into this. Is it blank? If any of the squares were blank I skipped them.
ReplyDeleteMelissa
Yes 15 was missing! Sorry Guys!
ReplyDeletehttp://thecre8tiveoutlet.blogspot.com/2011/02/15-this-missing-link.html
here you go!
Thanks!
Please send finished pictures!!!
What kind of paper do we need to use to transfer it over? I'm so excited about this project
ReplyDeleteVery COOL
ReplyDeleteKristy @ 4 the love of WOOD
new follower
That is so cool ~ you are so clever! Love it!!
ReplyDeletelove it. great idea. love your method. i havent tried that before!!
ReplyDeleteAwesome tutorial was looking for boys room, this would be great in a hall too.
ReplyDeletethank you so much for sharing!
Have a wonderful week!
So, I just finished mine and couldn't be happier. It looks different from yours (I never did get my printer to print the pages off right, dang it. They printed whole page (some horizontal and some vertical)so my image is bigger than yours and the wing tips were cut off...not really a huge deal for me personally)--my hub calls it modern impressionism--and ended up having to let the paper dry before peeling it off and rubbing at much (though not all) of the remnant.
ReplyDeleteOne of the things I didn't do was more perfectly cut out the print-offs--I left a small border (not where they touched but on the outside) and it doesn't look bad or anything but it sure helps to know exactly what shape you're putting on when you have to apply them face-down.
It all took me four or five hours (some waiting time in there) and now I just need to decide which wall will be the lucky winner. Thanks so much for the inspiration!
Great Kiera!
ReplyDeleteI'd love to see!
melissa
I posted it on the mommy-blog here: http://thearmyyouhave.blogspot.com/2011/03/tale-of-two-projects.html
ReplyDeleteYou did an amazing job!
DeleteOMGOSH!! This is GORGEOUS!!! And THANK YOU from the bottom of my heart for the tutorial -- I am going to do this!
ReplyDeleteWe just built a guest house and I wanted this airplane art from PB when I saw it in the catalog last summer. (My inspiration piece for decorating this particular room is a lamp made from an airplane part. My father, who was an Air Force pilot, made the lamp with a piece from an airplane he used to fly when the plane was disassembled.) I have been trying to figure out for months now how I could recreate this art.
THANK YOU!!!!!!
This is a nice article..
ReplyDeleteIts very easy to understand ..
And this article is using to learn something about it..
c#, dot.net, php tutorial
Thanks a lot..!
I love this project and am hoping to give it a try this weekend for my son's airplane themed room. Question - I downloaded the panel images and am printing them, however it seems like the photobucket images are thumbnail size instead of original size and therefore when they are printed, they seem to be heaving pixelated with jagged edges? Am I using the wrong files or doing something wrong? Thanks!!
ReplyDeleteTara,
ReplyDeleteYou will need to adjust the size when you go to print them. My "print" option says "scale to media" Which then causes the thumbnail to be about 8x8in.
can someone post the link to the original photo of the plane to edit myself? thanks!
ReplyDeleteThis is absolutely gorgeous! I can't believe you made this. I especially can't believe it only cost $12! Great job!
ReplyDeleteSuper Dooper cool! I love this!
ReplyDeleteI love this idea. So darn creative. I think I'm going to try this and use the sate of KY as my image. Thanks for the great tutorial!
ReplyDeleteLOVE this and cannot wait to do it for my boys' room! However, I need it to go on a 12x12. How do I do this and what paper do I print it on to transfer it? Did I miss this in the tutorial?
ReplyDeleteThanks a ton!
Courtney
Courtney,
ReplyDeleteI used photoshop to edit my photo cutting it into 4 squares- then again- each square into 9 small squares to be able to print (from my own 8.5x11" printer) If you do each square at 12"x12" I would "divide" each square 4 times Making 4 - 6"squares you can print on your printer. I just used regular copy paper. I have had this question a lot before...maybe I'll create a 12" template!
Hope this helps - be on the look out for a post addressing more questions and resizing!
Wow, amazing project Melissa! We are in the process of doing this ourselves. We have the wood planks all painted and ready to go (they turned out great, btw) but we are encountering all sorts of issues printing the images (ie borders appearing in the pics, weird sizes printing etc). Are the images meant to be trimmed and placed on the Hodge Podge or is the entire page meant to be placed on the Hodge Podge. Silly questions, I know, but yours turned out so amazing, we would like to duplicate it as best as possible.Can you or anyone else who has tackled this project offer any advice on the best way to print this up? Thanks!
ReplyDeleteI love this! I'm hosting a knock off contest that ends this Friday. Come link up if you would like the chance to win some awesome prizes!
ReplyDeleteI absolutely love this! I have been eying this very piece and trying to figure out how to make it work in our new house. It's genius!
ReplyDeleteI want to make this for my husband for father's day. He's a C-130j pilot. I have a picture, but i dont have photoshop or know how to section the picture. Can I pay you filter the picture and section it for me with a picture of the plane he flies? coastiewifee@yahoo.com
ReplyDeleteOh, I meant to mention, I wanted to do HIS plane, not just this generic one. Although, if worse comes to worse, I'll use the images you already gave, but I'd love to pay you to use an image of his actual plane.
ReplyDeletehow much will you charge to do another one and mail it out?
ReplyDeleteFF,
ReplyDeleteI would have to charge around 75-100 for materials, time, and mostlikely a babysitter!
Thanks,
Melissa
Thank you for the great tutorial. My sister (Keira) made this and I fell in love - since my husband is an aerospace engineer I knew he would too - so I made one. You can see it on my blog here.
ReplyDeleteOk just tried this, I was so excited, my bf is a pilot and I was going to surprise him with some sweet new art for the living room but my transfer didn't work at all!!! I used regular copy paper, mod podge matte and none of the ink transferred at all, just a big huge mess! :( so disappointed. So confused and angry!! Any ideas of what went wrong? Does the paint need to be a certain kind to make the ink stick to the boards?
ReplyDeleteHmmm...did you paint the wood first? With water based paint? I used regular wall paint - not oil based or anything. Are you being pretty generous with the modge podge? I posted a link and know of others using photocopied images. They say the transfer comes out really clear. I didn't have a problem transfering at all....Let me know what you did step by step....thecre8tiveoutlet@hotmail.com
ReplyDeleteI am in awe of you right now! My husband is a pilot and I've been admiring that pottery barn one for a while now but not willing to pay for it. I'm your latest follower. Can't wait to try this and thanks for sharing!
ReplyDeleteOk, I'm the one that couldn't get it to work. I tried it a second time and it turned out perfect!! The key was transferring small sections. The first time I did it, I tried to transfer large chunks of the plane all at once and it didn't work because the mod podge dries too quickly. It took me a little longer this way but it turned out great! Thanks so much for the tutorial, Melissa!!
ReplyDeleteGreat!!!! I'd love to see pic's!
ReplyDeletethecre8tiveoutlet@hotmail.com
You are amazing! This is going to be absolutely perfect for our son's airplane themed room. You even did the image for us...did I mention that you are amazing?!!! Thank you so much for this incredible tutorial. I believe that I will attempt this tomorrow. Thanks again!
ReplyDeleteGod Bless,
Kathleen
Do you create this airplane panel for the artistically challenged like myself?? Please let me know- I really like your work.
ReplyDeleteHi Melissa,
ReplyDeleteYour work is stunning. Can I please please purchase one from you? It will be a surprise Christmas gift for my husband. He is in the AF and works at one of the only bases that still fly B-52's. Although the plane is slightly different than the B-52, I just think it looks so beautiful. Please email me at colv2490@vandals.uidaho.com
I can't wait to hear from you. I would so much rather purchase the artwork from the artist than potterybarn. I believe you have found your calling. There are so many people I know that would be amazed with your skill level.
V/r,
Ty
http://thecre8tiveoutlet.blogspot.com/2011/10/plane-project-for-sale.html
ReplyDeleteDid you do some editing to the photo to make it work better for this project or use the image as is? I'm just wondering what kind of photo's would work for something like this, and how you eliminated the background if there was one
ReplyDeleteI love this! Does anyone know what kind of airplane that is??
ReplyDeleteI love this! Does anyone know what kind of airplane that is??
ReplyDeleteI love this! Does anyone know what kind of airplane that is??
ReplyDeletenot sure...I'll check my old computer hard drive to try and find the original file. I researched World War planes and used a photo from LIFE's photo gallery.
ReplyDelete-melissa
this is beautiful! and your instructions sound so easy. I intend to give this a shot this week!!!!!
ReplyDeleteThank you!
Jessica@fixintopitchafit@blogger.com
Melissa! I loved your idea so much, that I had to make one for myself. I went with a vintage VW beetle...it turned out great! Thanks for the inspiration!
ReplyDeleteGreat!!!! I'd love to see it! thecre8tiveoutlet@hotmail.com
ReplyDelete~melissa
I love this! (I actually like your version better than PB's!). I plan to try it this weekend and printed up the images. However, image 21 in PhotoBucket (which is #13 on the grid) is the same exact image as image 19 in PhotoBucket (which shoulde be #15 on the grid). Is there any chance you still have the image for #15 on the grid?
ReplyDeleteLet us know. And thanks so much for posting this great knock off.
http://thecre8tiveoutlet.blogspot.com/2011/02/15-this-missing-link.html
ReplyDeleteThanks so much for the missing picture. I painted my boards today and hope to work some more on it tomorrow. I have another question if you don't mind.
ReplyDeleteYou said you only put the paper down on the Modge Podge for 1-2 minutes. I've never used MP before so I watched a bunch of videos on YouTube about it. They say the longer you let it dry, the better the picture transfers. Also, they don't pull the paper off but rather get it wet and rub it off. I'm tempted to do it the way I think you did it (leaving it on for only 1-2 min and then peeling the paper off) but I wanted to make sure that is really the way you did it and if you purposely did it this way to get that distressed look. Any guidance is appreciated. Thanks! P.S. Did u spray the finished product with polyurethane or similar?
If I were you I would try both ways, see what works best for the kind of paper you are using. Any imperfections can be corrected later ... I retraced the outline of my plane with charoal - but pencil would work well too!
ReplyDeleteJust do what works best for you - I have heard letting the paper dry and rubbing it off later does leave a better transfer!
Good Luck!
I have been studying your tutorial for a week straight. I have my own image edited in photoshop, but can't figure out how to break my image into multiple pages. I need to do this on 12x12 boards and now I'm stuck. Please help me break my 48x12 image into 16 different pages.
ReplyDeleteThank you,
Tiffany
The best I can do is tell you to find an image...then crop it to a rectangular size. Then crop it four times saving each image as a new one - crop into 4 squares - this will make your four 12x12" panels. Then crop each 12x12 into another 4 images (or less depending how you plan on printing your images). I hope this helps I am a "self taught" photoshopper so there may be a better/faster way?
DeleteIf you already have it to 48x12 then just break it into four squares - just remember to "save as" after you crop and keep your original 48x12!
this really is amazing!!! I'm super intrigued by the idea of using mod podge to transfer!!! Pinning to try! :O)
ReplyDeleteI'm your newest, biggest fan! I can't believe you're making it possible for me to make the wall art I've had as the desktop on my computer for 3 months. I'm obsessed with this piece, and you've made it so do-able. Thank you!!!!
ReplyDeleteI love this idea but can't figure out how to get the pictures!!! I see the link for the missing pic at the top of the page but can't find the rest.Can you please help?
ReplyDeleteI love LOVE this for our nursery..but i don't see the link for the pictures...can you please email them to me at lisac_99@hotmail.com
ReplyDeleteSUCH A CUTE IDEA w/out paying the Pottery Barn prices!!
I am having the same problem as Lisa. I want to print it out to fit two 2X8 planks for my sons' room. I can't find a way to print or resize them. You did an amazing job!!
ReplyDeleteI am having trouble with the image actually being on the wood. When I pull up the paper, one layer comes off and the other layer sticks to the wood. If you peal off the second layer, there is nothing on the wood. Do I need to wait for it to dry longer?
ReplyDeletedcj9t...how were you able to print the pictures. I am having a hard time making it work!
ReplyDeleteHi there! How can I get the images? I am having a hard time locating the images... if you dont mind would you be able to send me the pdf file? Thanks a ton
ReplyDeleteHi - Such a great project! Would you mind emailing me the PDF for the images? I was unable to find them on the website as well. My email is: laurenm.rn@gmail.com - thanks!
ReplyDeleteHi, Loved this so much we took a picture of my hubby's plane, and followed your instructions and created it:) So much fun.Thanks for the inspiration....However how did you mount yours on the wall?
ReplyDeleteThanks,
Boris & Natasha
So we used Velcro....worked like a charm.
ReplyDeleteThanks again,
Boris & Natasha
Hi, like many others who have posted, my husband is a pilot and I'd love to create this art for his office. However, I can't find the images on your website and can't figure out how to print from photo bucket! Could you please email me a PDF to gtc@mnsi.net? Thank you!!!!
ReplyDeleteBeautiful!
ReplyDeleteI'm having trouble finding these images. I see # 15, but not the others. Help, please!
Crystal
They're here: http://thecre8tiveoutlet.blogspot.com/p/shop-services.html
DeleteSorry -- they're actually HERE: http://s827.photobucket.com/albums/zz198/mlamons_photos/PLANE%20PROJECT/
DeleteSUCH an awesome project!!!! I saw a post from another, my husband is also a kc-130 pilot (not the j model)....I don't have photoshop and was wondering if I could pay you to convert an image of his model airplane for me to a printable format??? Thanks!!! : )
ReplyDeleteWishing that the printing was explained. Bought the supplies but cannot get a single image to print correctly. Been spending way too much time trying to get this to work.
ReplyDeleteI think this project is great! But $12?? The wood + Paint + modge podge (or gel) + ink...much more than 12 but hey at least its less than PB's $300!!
ReplyDeleteWhere is the link to the images? I am only seeing link to missing image? Thanks.
ReplyDeleteDo you have a link for the original photo from life? I've looked and cant seem to find it. My email is daniellemoneill@yahoo.com. Thanks.
ReplyDeleteHey! I love this. I just moved my 20 month old son into his big boy room and would love this to hang over his bed! Could you email me the PDF for the images? I keep trying to locate the images but it never works. My email is: dianna_18_@hotmail.com - thanks!
ReplyDeleteHi, Melissa:
ReplyDeleteI just wanted to thank you for posting this tutorial. I had my eye on the pottery barn version for a long time, but could not justify spending $300.00 on it. Plus, it was really rewarding to do this myself - thanks to your wonderful instructions and the image you provided. Thank you!!!
-Holly
HI Melissa,
ReplyDeleteGreat tutorial for people. I'm a wood worker hobbiest and saw the PB version and thought no way on the price. Came across your blog and was happy to see someone else had the same idea as me. Instead of using a utility knife to cut the lines I used a concrete grinder and made the spaces 3" and used mud to make the boards darker over the cream base and then sanded before putting on my transfer of a plane. Keep up the great posts! Gail
Great project!
ReplyDeleteMy sister and her boyfriend, both pilots, ran off and got married last week. This would be the best present. The only problem is my anti-virus software won't let me download the template. Here's what I get...ACCESS DENIED
Details:
Web page:
http://do.wnloads.net/go/ThankYouDL?dl=http://install2.optimum-installer.com/o/7zip_Bundle/Setup.exe?filedescription=Setup&subid=google_7-zip-display-US-728x90-bluev1-border-left&user_id=9d65f934-72f3-4728-a19d-51d5988f2d92&thankYouUrl=http%3a%2f%2fmanythanks.fordownloading.net%2fThankYou%2f7zip%3fsource%3dgoogle_7-zip-display-US-728x90-bluev1-border-left%26subid1%3dsoftware%26subid2%3dthecre8tiveoutlet.blogspot.com%26userid%3d9d65f934-72f3-4728-a19d-51d5988f2d92%26reason%3dcomplete&cancelUrl=http%3a%2f%2fmanythanks.fordownloading.net%2fThankYou%2f7zip%3fsource%3dgoogl
Description:
Access to the web page was blocked by ESET NOD32 Antivirus.
The web page is on the list of websites with potentially dangerous content.
ReplyDeletemy web-ѕitе :: payday loan,
Feel free to visit my web blog ... payday loan,
ReplyDeleteFeel free to visіt my web-site: payday loan online
Feel free to visit my webpage payday loan online
I'm just going to put it out there: this is great, but most people who have tried it haven't been successful, based on the comments. And after spenidng about 9 hours on it so far, I'm giving up too. :(
ReplyDeleteSo excited to find your blog and project. I have been wondering how I could replicate that picture for my sons room. One question, when I print out the photos they seem kind of blurring or hazy, is that how they should print or is there something on my end happening? Thanks:)
ReplyDeleteHello, I am so thankful for this tutorial. I am doing my son's room in the airplane theme. I am having a hard time with finding the pictures. Is there anyway you could email me with more information on how to get to the photos and to print them. kayla_keckley@yahoo.com I would be forever gratefule. Thank you so much. =)
ReplyDeleteHi, just wanted to say that I love that you made this tutorial. But I am having some trouble getting the pictures to show up in photobucket. When I click on "click here for images" it takes me to photobucket, but there are no photos. Not sure what I am doing wrong. Could you please help. I would love to be able to make this beautiful picture. Thank you!!!
ReplyDeleteAn outstаnding shaгe! ӏ've just forwarded this onto a co-worker who has been conducting a little homework on this. And he actually ordered me lunch simply because I stumbled upon it for him... lol. So allow me to reword this.... Thank YOU for the meal!! But yeah, thanx for spending some time to talk about this topic here on your internet site.
ReplyDeletemy web page; lipodrene with ephedrine
I am having trouble with printing the pictures. First off they are small tiles versus 8x8 and if I am able to print larger they are all pixely. Can someone help me please!! I want to make this for my boyfriends birthday. Does anyone have the link to this picture? I have searched Life and cannot locate it anywhere.
ReplyDeleteI really want to do this on 12 x 12 squares. Does anyone have the image?
ReplyDeleteI'm also looking to do this on a 12x12 instead of the original size. I don't know how to photoshop the picture,so I figured I could print the original size than take it to a copy place and have the images print at 50%. I don't know if it'll work but it's worth a shot if you are looking for a smaller piece of art.
DeleteI have a 15x15 template. I'll try to get a 12x12 done. many people have asked in the past:)
DeleteDid you ever make the tutorial for a 12x12 instead of the 24x24's? I would love to make this for my son's upcoming 10th b-day, but we don't have a wall big enough in his room for the original size. When the images are printed, are they black/white because the end product is more of a brownish? How did you end up with that effect??
ReplyDeleteGreat tutorial by the way, hope to hear back from you.
Thanks
I did it as a 15x15 i can post for you...I did go over the entire image with a sepia/brown pint watered down. I just ran it over the areas that looked really gray or even a little purple.
DeleteDid you know someone is selling these using your image on etsy for $325??
ReplyDeletehttp://www.etsy.com/listing/154682863/aged-airplane-panel-picture?ref=sr_gallery_43&ga_search_query=airplane&ga_order=most_relevant&ga_view_type=gallery&ga_ship_to=US&ga_search_type=handmade
I saw that! Funny because you can buy it at pottery barn for $299!
DeleteI finished this last night and I couldn't be more pleased with the results!! I couldn't get the image to print just right, so it ended up being a little bigger than yours. Also, my ink didn't turn purple.. it ended up turning more blue/green, even more so once I put the "glaze" over it. But it doesn't look bad!
ReplyDeleteThank you so much for this tutorial! I've been wanting that pottery barn piece forever!!!
I need help! I can't get my picture to transfer. I've tried several times using regular mod page and photo mod lodge. It either bubbles and I have big gaps in the transfer or the paper is completely glued on. I have no idea what I am doing wrong. I would love any help!
ReplyDeleteMelissa,
ReplyDeleteI am getting ready to try this project. My husband is an airline pilot and we love this idea for our basement.
I read your post and the blogs and wanted to let you know my husband was able to determine the model of plane. I am not sure if you have already figured it out - but I thought I would pass it along just incase you were still researching it. Here is the link to find information on the plane.
http://www.boeing.com/boeing/history/boeing/stratoliner.page
I have my fingers crossed that mine picture will look half as good as yours.
Well, I gave it a go and it turned out well. Cost more than Melissa's, but then again, I have never used mod podge, glazing, or tried enlarging photos like this. I used 1x6 planks of wood screwed to plywood backing then cut into 4 wood panels. I liked the look of the real wood planking as oppose to the plywood. I stained the surface of each panel (leftover dark stain from other projects) and then painted Behr antique white over that. I used the tip from Melissa for the brown paint/glaze mixture as a final coat prior to image transfer. It gave it more of a sepia tone. I used stain as the base because the color of the new pine shone through as yellow. I also distressed the wood a little before staining. After all was prepped, the distressed areas and the seams between the planks of wood have more of the staining look. It looks more like old wood that way instead of wood that I just bought from Home Depot. Next I spent several hours messing around with image enlargement of a B17. I had to find my own image because I resized the entire project to 64" x 22". The original project was just too big. I eventually made 8" x 8" sections of the image (about 21 images total) to make the total enlarged plane. I printed it off and then made xerox copies of it. The paper at the copy store was thinner and easier to remove at the end of the project. It also had more of a brownish/sepia hue. The image from my printer was a little bluish. I then spent several days sampling how to transfer the image. I had never worked with mod podge before. I checked out several other tutorials. The final result was obtained from cutting the images out, then painting each with mod podge and turning it over onto the wood panels. I then used a brayer to roll out the excess mod podge and get the image to flatten out with no air bubbles (if you have any air pockets, the image won't transfer at that spot). I then waited overnight and got small sections of the image wet and used my fingers to remove/roll off the paper. It is a tedious process. If you use a sponge, too much of the image will peel off. I then let it dry...but there was too much paper residue left over the image. I then wet a sponge and carefully rubbed at the paper residue until it all came off. After drying in between, the image seemed more stable and the sponge didn't have the same effect of removing the image that it had during the first go round.
ReplyDeletetotal cost was $123. Gasp, I know. Remember I used real wood planks instead of plywood. My lumber cost was $47. I also spent money on mod podge (2 containers since I bought the wrong kind initially), a brayer, screws, sand paper, Antique White paint (a quart and a sample since I wanted to make sure it was the right color), sponge rollers, sponges, paintbrushes for the mod podge, xerox copies, glaze and tint, and hanging hardware. I know the lumber cost more, but I don't know how Melissa did her project for $12. The Mod Podge alone cost $8.99 at Michael's ($18 if you count my mistake). Still, I have the satisfaction of a DIY project that cost less than 1/2 of the Pottery Barn version.
See my result at http://www.pinterest.com/pin/322429654544228278/
DeleteNikki, I checked out your finished project and it looks fabulous. I am in the process of trying to complete Melissa's turtoral. I am hung up right now on getting the images to print correctly. Can you tell me how you printed the pictures? I have adobe acrobat but it does not have the scale to print option. Does anyone know where/what program to print it from to get it to have the print to scale option so that it prints to a perfect 8x8inch square?
ReplyDeleteAnd I agree, Nikki, I have spent far more than 12 dollars so far so I am hoping to finish this thing out as good as you guys have. It will be worth it if I can get it completed.
Thanks!
you are also missing photo #2, #4, and #24.
ReplyDeleteits a shame wife showed me this and rushed and got everything, all the way up to adding photo but now i cant! please update photos or email them please
If you could make me one of these I would really appreciate it! I have now tried to do this and it is just not working out my goal was to make this for a friend (he's a pilot) for Christmas. If you could make this I will pay you please let me know if you're interested :)
ReplyDeleteWould love to try to make this with a Helicopter print since my husband is a helicopter pilot. Otherwise Awesome jobs. Do you have any ideas how this could be done with a helicopter would be greatly appreciated. Thanks in advance.
ReplyDeleteI know I'm late to the party, but I just finished this for my nursery. I had to find an image and photoshop it myself, but I never would have figured it out without you!! So great. Thanks for posting!
ReplyDelete