Here is how we did it - step by step
1. we built the frame from reclaimed 2"x2" basic lumber, You can use basic (cheap) 2x2's.
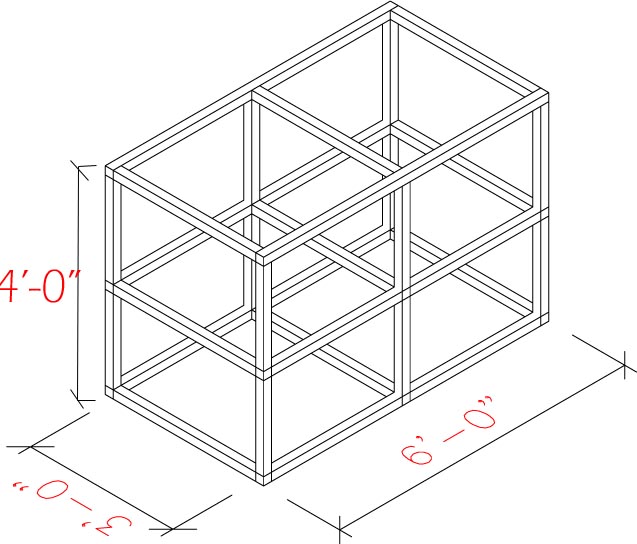
2. Create an indoor space (with an opening to the outside) We used a piece of plywood to create a floor (36"x36" notching out the corners for the 2x2's). Then we began adding boards to enclose it. The drawer I have shown was actually a modification we made after it was built...but what you can do is build it with a second piece of plywood and add 2x2's to create the "drawer" - then face it with a board you would have used for the back enclosure (I'll show more pic's further down the post)


3. On three sides of the enclosed area add doorways - one will be for accessing eggs, one for accessing the birds and food, and the last will be so the birds can get to the open area

 |
| opening to nesting box |
 |
| opening to main (chickens/food) |
 |
| opening to "run" |

4. continue adding boards or paneling to complete the "sheltered" area - since we used all reclaimed materials ours vary from paneling, 1x4's, and 1x6's

Down below you want to enclose two sides - for shade- make one side (doesn't matter which) have an opening for cleaning.

5. wrap any and every open areas with 1/2" hardware cloth - including the top which is left open for ventilation


6. add your roof
basically make a frame the same size of your coop then use supports (we used 2x2's) and raise one side about 5 inches. Add you covering....we used metal (it was free! leftover from another project) you could also use plywood and add shingles.


Hopefully you have something like this now!
now.....
More on adding a "poop drawer"
I cleaned out the coop without it...and knew we needed to make some sort of change.

I also added peel and stick vinyl tiles for easy cleaning

 |
| opening for the drawer |
 |
| Drawer closed! |
So that's what we did.

Looks cool! I want chickens this spring and, honestly, its getting a bit late in the game for me.....I gotta get on it! Thanks for the idea.
ReplyDeleteGood Luck!
DeleteOh boy. My sister and I were just talking about trying out chickens. If I can get over my fear of all birds, we will be giving this a go! Thanks- awesome instructions.
ReplyDeleteHa ha...I have a fear a birds too! That's why I knew I could only get them if we got them as baby chicks, if we would have gotten them as full grown hens I wouldn't go near them! Good Luck...It really has been quite fun!
DeleteThanks for linking up to the Creative Genius Link Party!
ReplyDelete