Showing posts with label backyard chickens. Show all posts

4.03.2012

The Scoop on the Coop - Part Two - Building your own chicken coop

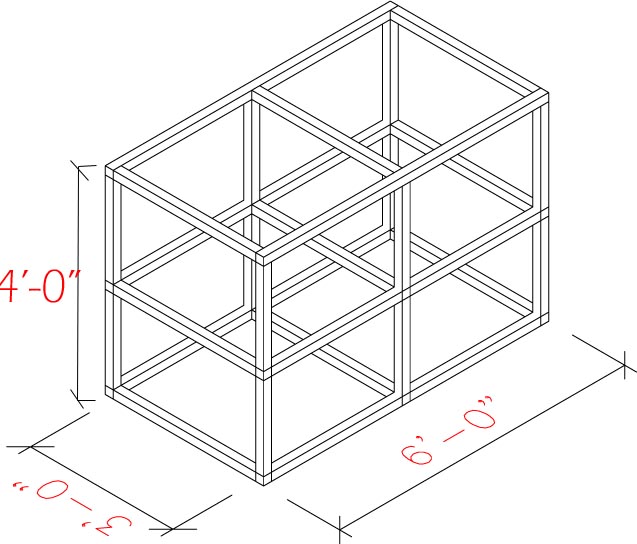
So If you've been following the Chicken Chronicles and you read yesterdays post The scoop on the coop - part one, then you know today I promised a better how-to of how we built our own chicken coop. Let's back up here in case you are just joining us...Backyard chickens also know as Urban chickens. The new trend of raising a small flock of chickens...in your own backyard. NOT on a farm...in our suburban sub-division! So as mentioned before we have 3 chickens...read more here about how we decided this and when we got them. So I did some research to see just how much space three chickens would need....a drew some REALLY basic sketches and went to work...
Here is how we did it - step by step

1. we built the frame from reclaimed 2"x2" basic lumber, You can use basic (cheap) 2x2's.
2. Create an indoor space (with an opening to the outside) We used a piece of plywood to create a floor (36"x36" notching out the corners for the 2x2's). Then we began adding boards to enclose it. The drawer I have shown was actually a modification we made after it was built...but what you can do is build it with a second piece of plywood and add 2x2's to create the "drawer" - then face it with a board you would have used for the back enclosure (I'll show more pic's further down the post)

3. On three sides of the enclosed area add doorways - one will be for accessing eggs, one for accessing the birds and food, and the last will be so the birds can get to the open area

opening to nesting box

opening to main (chickens/food)

opening to "run"


4. continue adding boards or paneling to complete the "sheltered" area - since we used all reclaimed materials ours vary from paneling, 1x4's, and 1x6's


Down below you want to enclose two sides - for shade- make one side (doesn't matter which) have an opening for cleaning.
5. wrap any and every open areas with 1/2" hardware cloth - including the top which is left open for ventilation
6. add your roof
basically make a frame the same size of your coop then use supports (we used 2x2's) and raise one side about 5 inches. Add you covering....we used metal (it was free! leftover from another project) you could also use plywood and add shingles.


Hopefully you have something like this now!

now.....
More on adding a "poop drawer"
I cleaned out the coop without it...and knew we needed to make some sort of change. 
I also added peel and stick vinyl tiles for easy cleaning


opening for the drawer

Drawer closed!


So that's what we did.
If you like it...do it too!

Linking here


4.02.2012

The Scoop on the Coop - Part One

It's Done!!!
Well I still have a little painting to do...wouldn't be our kind of project if it wasn't unfinished! This coop minus the roof has been in our garage since January! And for the last couple weeks...it had the chickens in it! Read more on baby chick care and our chicken chronicles here. So if you remember from before...we built our coop ourselves almost by ourselves with the help of Matt's dad. Since we only have 3 chicks we didn't need a huge coop..our city only lets us have 4 anyway...so I came up with a design based off hours on Internet research. The best part about this coop was the fact it was mostly free...that's right a free chicken coop! Matt's dad had a barn full of reclaimed wood! Even the roof material was a leftover from a previous family project.

I plan on posting "part two" with plans and a simple tutorial if you want to make your own chicken coop!
The overall construction is pretty simple! My favorite part was a last minute modification of a drawer....poop drawer. After cleaning this baby out and trying to sweep chicken poop from tight corners...I made a quick sketch and sent hubs to the hardware store ... no reclaimed wood for that part :(  Now I can just pull it out and dump it...no heavy cleaning required!


"ahhhh..... we're outside!"


poop drawer!


Stay tuned! I hope to have the construction and tutorial posted tomorrow!

<a href="http://pinterest.com/pin/create/button/" class="pin-it-button" count-layout="horizontal"><img border="0" src="//assets.pinterest.com/images/PinExt.png" title="Pin It" /></a>


MelissaThecre8tiveoutlet.blogspot.comthecre8tiveoutlet@hotmail.com
Posted by Picasa